|
|
|
|||||||||
|
|
Features
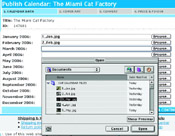
Create a Lulu of a Photo Calendar for 2006 What if you could put together a professionally-printed, four-color, spiral-bound calendar on heavy, semi-gloss paper stock in a couple of hours and then order and pay for only as many as you want? And what if the set-up was free? Sound too good to be true? Not if you let Lulu do it. Lulu.com is a totally automated print-on-demand publisher; after you put your calendar together it gets stored on their server, ready to go at a moment's notice. When a calendar order comes in, it's printed within three to four business days and then shipped by whatever carrier you specify. And it only costs US $11.45 each plus shipping, even cheaper if you order in quantity. If you want them to, Lulu will also sell your calendar online so both you and they can make a profit. Admittedly, you have to take a leap of faith because you canât email or call anyone at Lulu to guide you through the process -- that's why it's so inexpensive. But the instructions, with some rare exceptions that I'll get into later, are detailed and simple to follow. If you do run into technical trouble (like an upload that's not working) you can contact them online and they'll fix it. After registering at their site, I clicked into the calendar section to begin my project, a 2006 cat calendar I named The Miami Cat Factory. Since I wasnât interested in selling it commercially, I clicked on Direct Access which made my calendar available only to myself and those with whom I shared a private URL: (www.lulu.com/content/147681). Feel free to order a copy if you want to see the kind of quality Lulu offers using Xerox's new state-of-the-art iGen3 color presses. I used cat pictures taken with a variety of cameras Iâve reviewed over the years, some with resolutions as low as 1MP.
I chose to do a standard calendar with classically laid out date pages annotated with national holidays. There are other styles available and you can even insert your own event reminders. Uploading my images (about 65MB worth) took 50 minutes, even with a high speed internet connection. Donât despair. Even if the status bar doesnât seem to move, things are happening behind the scenes. Walk your dog, pet your cat or have a cuppa. By the time you come back, thumbnails of your pictures will be on miniature calendar pages. Then it's time to do the cover. Your cover title will be the same name as your project, so remember that when you first name your project. Trying out different typefaces, sizes, and colors was fairly straightforward but when I wanted a credit line to read "Photographs By" all I got was my name. So I went back to the beginning and changed the author's first name field to Photographs By and last name field to Arthur H. Bleich. That did the trick. There are also a few options on the Cover page that only apply to book covers -- ignore them.
The next-to-final step involves a conversion process that gets your images press-ready. Despite Lulu's warnings (mainly for book authors) about how long this might take, it was finished in less than five minutes and the status bar for this step worked fine. I put my calendar together on a Sunday afternoon. Conceivably the conversion process could take a longer at peak hours. If that seems to be the case, just opt to have Lulu send you an email when it's finished.
Lulu's free, print-on-demand technology makes it virtually effortless to produce a professional-looking calendar. And with no minimum order required, you don't run the risk of having a stack of them moldering away in the corner of your garage. So go ahead and try it. I was delighted with the results and Iâll bet you will be, too. Preparing
Your Calendar Images 1. Set your imaging programâs mode to RGB for color pictures -- do not use CMYK. For black and white photos, use Grayscale or RGB, 2. For your 12 monthly photos, pre-set your crop width to 10 x 7.5 inches (3000 x 2250 pixels). This will assure that all images will automatically end up at the correct size as you crop them. 3. If you plan to use a cover image (instead of a plain cover), size it at 10.75 x 8.25. (3075 x 2475 pixels). Again pre-set your cropping tool to that size. 4. After you crop your image, resample it to 300 ppi. You can go as low as 150 ppi if your image looks rough when upsampled to 300 ppi. 5. After resampling, give the photo some sharpening using the Unsharp Mask filter. Hereâs a good starting point: Amount, 150; Radius, 1.0; Threshold, 0. Or just use Sharpen or Sharpen More. 6. If your images are JPEGs, make sure they are saved at the maximum quality setting (using Photoshop or Elements, that's number 12). If you've worked from anything other than a JPEG image, convert it to JPEG after itâs been cropped and resampled. Use ăSave Asä, select ăJPEG,ä and use the highest quality setting. 7. Now decide which images will go on the monthly calendar pages and rename them "1_jan.jpg," "2_feb.jpg" and so on and put them all in one folder named Calendar. This naming scheme is not required but it will make it easy for you to find your pictures and make sure they end up on the right pages. 8.
If you are going to use one of your inside images for the cover,
duplicate it, upsize it, and name it "cover.jpg." |
||||||||
|
|
|||||||||
|
©
2004 D.C. Publications, Inc. All Rights Reserved. |
|||||||||
 Calendars
are great for showing off your pictures but grinding them out slowly
on an inkjet printer and laboriously assembling each one by hand
isn't my idea of fun. It's not cheap, either.
Calendars
are great for showing off your pictures but grinding them out slowly
on an inkjet printer and laboriously assembling each one by hand
isn't my idea of fun. It's not cheap, either. 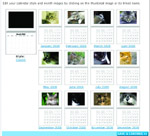 I
began by assembling my images and pre-sizing them to go on the monthly
calendar pages (see Preparing Your Calendar Images). Then I plunged
in, reassured by Lulu that revisions could always be made, even
after the calendar had been finalized. You can also scratch the
entire project and begin over if you want to. And you don't have
to complete the job in one session; you can work on it over several
days or weeks. Since thereâs no charge for any of this, there's
no pressure. So do as I did and just take it a step at a time. If
you run into a glitch or two, itâs not fatal.
I
began by assembling my images and pre-sizing them to go on the monthly
calendar pages (see Preparing Your Calendar Images). Then I plunged
in, reassured by Lulu that revisions could always be made, even
after the calendar had been finalized. You can also scratch the
entire project and begin over if you want to. And you don't have
to complete the job in one session; you can work on it over several
days or weeks. Since thereâs no charge for any of this, there's
no pressure. So do as I did and just take it a step at a time. If
you run into a glitch or two, itâs not fatal. 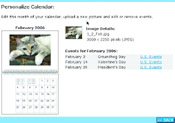 The
cover text and its placement is bare-bones, to say the least, so
you might want to consider a work-around that will allow more flexibility.
Try laying out the cover in your imaging program, adding text and
other design elements wherever you want them. Then upload the composite
image as your cover photo, leaving all the option boxes unchecked.
This will also work on individual calendar pages if, for example,
you want to do multiple images per page, a caption under each picture
or a photographerâs credit.
The
cover text and its placement is bare-bones, to say the least, so
you might want to consider a work-around that will allow more flexibility.
Try laying out the cover in your imaging program, adding text and
other design elements wherever you want them. Then upload the composite
image as your cover photo, leaving all the option boxes unchecked.
This will also work on individual calendar pages if, for example,
you want to do multiple images per page, a caption under each picture
or a photographerâs credit. 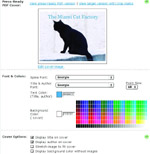 Next,
you get a chance to examine the PDF files that have been created
of your calendar, make any changes (if necessary) and then give
your final approval. Once thatâs done you'll click along to the
pricing page. If the calendar will be bought just by you, friends,
and family, the cost will be US $11.45 each. If you want to put
it into general circulation, then set your own price and Lulu will
calculate their commission and your per-calendar profit.
Next,
you get a chance to examine the PDF files that have been created
of your calendar, make any changes (if necessary) and then give
your final approval. Once thatâs done you'll click along to the
pricing page. If the calendar will be bought just by you, friends,
and family, the cost will be US $11.45 each. If you want to put
it into general circulation, then set your own price and Lulu will
calculate their commission and your per-calendar profit.