|
|
|
|||||||||
|
|
Reviews
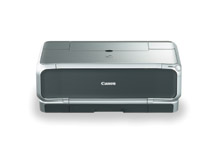
Canon Pixma iP8500 Printer
Dual
paper tray But that‚s a minor glitch and only held me up a little while in getting the printer up and running. And I am getting ahead of myself, because before loading paper it makes sense to load the ink cartridges. As with other Canon printers, the printer head with its 6,144 discrete nozzles is a separate part and must be put into the carrier inside the printer before loading the ink. The fact that the printer head is separate is important, because this means you can easily replace a damaged print head without having to send the printer anywhere for service. I must point out, though, that I have never had to replace a print head on any of the Canon printers I have used over the years. Anyway, once the print head is put into place the eight separate ink cartridges are snapped into the appropriate slots one at a time until all eight have been loaded. Why eight? Original color printers used four colors of ink, the same four as in standard four-color printing like that used to produce this magazine. This is called CMYK, for Cyan, Magenta, Yellow, and blacK. When Canon upgraded to six colors of ink they added a lighter Cyan and a lighter Magenta, called Photo Cyan and Photo Magenta. These additional colors of ink improved the rendering of subtle colors and shades. With CMYK printing, you get red by using equal parts of Magenta and Yellow, and to produce green you use equal parts of Cyan and Yellow. This works pretty well for most reds and greens, but some shades of these colors are difficult to reproduce accurately. For this reason, Canon has added Red and Green inks to the previous six colors. Will future printers have even more colors of ink? In commercial printing some fine art printers have used 12-color offset printing, so we may at some point see photo printers offering more than eight colors. But for now we have eight colors in Canon‚s ChromaPLUS inks, and that seems to be plenty. Having each of the eight colors of ink in a separate cartridge prevents waste, because you are only replacing empty cartridges, not throwing away cartridges with some ink still in them. Hassle-free
printing Over the month that I was testing this printer I made more than 100 prints and the only times I had any problems were when I did something wrong. I tried printing images with lots of reds and greens in them and compared them with prints made on my earlier six-color Canon printer. The differences were subtle and more visible in some prints than in others, but the prints from the iP8500 were definitely superior. Flesh tones were particularly good. I really loved the ability to switch quickly from one paper type to another, and for some of my work I loaded 4 x 6 glossy photo paper into the lower tray and was able to switch from one size to another in a matter of seconds. In addition to printing from a computer, the iP8500 also has a PictBridge port on the front for direct connection to cameras. This allows you to print directly from cameras, both still and digital video, that support the PictBridge feature, without the need for a computer. Canon
Pixma iP8500 Bubblejet Printer ˆBob
Shell
|
||||||||
|
|
|||||||||
|
©
Digital Camera Magazine. All Rights Reserved. |
|||||||||
 Canon
has never been a company to sit back on their laurels when they
have a really great product. So I was interested when I heard that
they had upgraded their line of inkjet photo printers and now offered
eight-color printing on some models. Since I had been really happy
with the results I had been getting from their six-color printers
I really wondered just how much better it was possible for the new
printers to be.
Canon
has never been a company to sit back on their laurels when they
have a really great product. So I was interested when I heard that
they had upgraded their line of inkjet photo printers and now offered
eight-color printing on some models. Since I had been really happy
with the results I had been getting from their six-color printers
I really wondered just how much better it was possible for the new
printers to be.