|
|
|
|
|
|
|
|
|
|||||||


|
Reviews
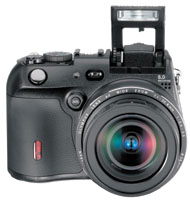
OLYMPUS C-8080 The camera is ergonomically designed to feel solid and professional in your hands. It weighs in at about a pound-and-a-half, including battery and memory card. All I carry on most picture taking occasions is the camera, and an extra CF card and back-up battery in my pocket. And with this minimum outfit, my results are better than anything I remember when I was shooting with 35mm film. Contributing to the excellent picture quality is the Olympus lens that comes with the C-8080. It works in a 28mm to 140mm range÷ in 35mm camera terms. That covers a lot of useful ground. The wide extreme is an ideal focal length for group photos and also works well as a dramatic focal length for architecture and outdoor scenes. The 140mm telephoto setting covers most sports and action shots adequately. In between, the 85-90mm range is perfect for portraiture. Of course, the real focal length is 7.1mm to 35.6mm. This is both an advantage and a disadvantage. At these short focal lengths you have extraordinary depth of field and most of the stuff in your picture is sharp. ThatŌs an advantage. The disadvantage, though, is that you may not always want everything sharp. ItŌs hard with any of the digicams in this category to get shallow depth of field.
Getting back to f-stops, there is a reason that manufacturers find it difficult to make them smaller: the optical quality would suffer from really small openings of short focal length lenses because of a phenomenon called diffraction. While smaller f-stops do give you greater depth of field, you also begin to lose overall image sharpness. The old rule of thumb is that youŌll get your sharpest pictures at 2 ÷ 2-1/2 stops down from the widest opening of the lens. I did a studio set up to illustrate to my digital camera class the comparison of various resolutions and what they mean. To make this kind of comparison and not skew the results with different subjects, I set up a controlled still life and photographed it at every resolution available on the C-8080÷ RAW, TIFF, SHQ, HQ, SQ-1, and SQ-2. Lighting was provided by a tungsten soft box and all the pictures were printed on an Epson 2000 printer using 13x19 paper.
The C-8080Ōs many, many options can be a little overwhelming at first. Although there are more than a dozen buttons on the camera body that control various settings, itŌs quicker to use them than to go through menus. For instance, pressing and holding the button with a left pointing arrow while turning a wheel just below the hot shoe lets you easily scroll through your resolution choices. When you like your choice, just let go of the button and the camera is set. The flash, exposure compensation, and other function buttons work the same way, so once you learn the sequence it becomes second nature to use them during a shooting session.
IŌve been setting the white balance to Auto with very good results. In addition to Auto, there are two sets of presets, plus custom, plus one-touch white balance. I found the presets confusing. In one of the presets you can choose from four kinds of fluorescent settings but the picture icon for each of them looks the same. This is a matter of too many choices. The one touch WB works by aiming your camera at a white piece of paper or other white surface and pressing the OK button.
Which brings me back to RAW. If your goal is making beautiful prints beyond snapshots, you can set the camera to RAW and the white balance to AUTO and the only other thing to set is the ISO setting. Everything else can be changed later. Ironically, if you just need casual snapshots, the white balance and the other settings should be as correct as possible because big changes in an imaging program are damaging to the quality of the picture. Summing up, the camera turns on quickly and has less shutter lag than my earlier cameras. I prefer to preview the image on the LCD monitor and the swing-out adjustment of the LCD monitor is useful for low angle photos and even the occasional over-the-head shot. I wish the viewfinder produced a more photographic image. I know IŌm more-or-less accurately framing the subject but I hate the way it looks after years of composing through real groundglass pentaprisms. Also, the zoom control is very antsy - it moves very fast and itŌs hard to frame images precisely. The included infrared remote is very useful when doing a macro shot or anything exact because you can fire the camera with no accidental movement. Battery life is very good. With my other cameras, IŌve always needed the spare in a few hours of shooting, but not with this excellent Lithium-Ion battery. My routine has been to shoot either RAW or SHQ. I like to use the RAW at ISO 50, if at all possible. When shooting in poor light at ISO 400, I feel that RAW has no real advantage so I shoot SHQ. Overall, there is probably more of a learning curve with the C-8080 than with most consumer cameras, but the control it offers and the quality of images it produces makes the effort worthwhile. ÷Al
Francekevich
|
||||||
|
|
|||||||
|
©
2004 D.C. Publications, Inc. All Rights Reserved. |
|||||||
 My
digital camera experience has gone from 3 MP to 5 MP to 8 MP, in
just a few years. While megapixels alone are not the only criteria
for image quality, Olympus has put together a very impressive package
in their new C-8080. The improvement in resolution over each previous
camera is very real, and while I made nice 13 x 19-inch prints from
my 3 MP digicam, I now make smoother and sharper images from the
8 MP. I can even afford to crop a lot and still make beautiful 13
x 19Ōs.
My
digital camera experience has gone from 3 MP to 5 MP to 8 MP, in
just a few years. While megapixels alone are not the only criteria
for image quality, Olympus has put together a very impressive package
in their new C-8080. The improvement in resolution over each previous
camera is very real, and while I made nice 13 x 19-inch prints from
my 3 MP digicam, I now make smoother and sharper images from the
8 MP. I can even afford to crop a lot and still make beautiful 13
x 19Ōs.  On
the C-8080 the smallest f-stop is f-8. Now f-8 will give you plenty
of depth of field, probably equivalent to f-22 on your 35mm film
camera. That I can live with. But one problem I havenŌt solved is
that I have to work pretty hard to get my studio strobes to shoot
at low enough power not to overexpose my images when I can only
stop down to f-8. Furthermore, the C-8080 has no ŃPCõ flash terminal!
A camera with these capabilities should certainly have a way to
plug in professional studio strobe units. There is a work around,
though. You can buy an inexpensive accessory that lets you connect
a PC cord to the hot shoe on the top of the camera.
On
the C-8080 the smallest f-stop is f-8. Now f-8 will give you plenty
of depth of field, probably equivalent to f-22 on your 35mm film
camera. That I can live with. But one problem I havenŌt solved is
that I have to work pretty hard to get my studio strobes to shoot
at low enough power not to overexpose my images when I can only
stop down to f-8. Furthermore, the C-8080 has no ŃPCõ flash terminal!
A camera with these capabilities should certainly have a way to
plug in professional studio strobe units. There is a work around,
though. You can buy an inexpensive accessory that lets you connect
a PC cord to the hot shoe on the top of the camera.  The
best was RAW, followed by TIFF, and then SHQ, which is the least-compressed
JPEG. But it would be hard to pick out which was which if I hadnŌt
marked the prints. TIFF, SHQ and the other JPEG setting have some
camera sharpening built in. You can adjust that in the C-8080 from-5
to +5. I leave this set at the midpoint, which is 0. If you want
to shoot RAW, you have to be resigned to a little extra work, using
either the manufacturerŌs software or the RAW converter in Photoshop
CS, which I used. RAW always requires some sharpening and lately
IŌve been using Focus Magic (www.focusmagic.com) at a very low setting
(2 or 3 usually).
The
best was RAW, followed by TIFF, and then SHQ, which is the least-compressed
JPEG. But it would be hard to pick out which was which if I hadnŌt
marked the prints. TIFF, SHQ and the other JPEG setting have some
camera sharpening built in. You can adjust that in the C-8080 from-5
to +5. I leave this set at the midpoint, which is 0. If you want
to shoot RAW, you have to be resigned to a little extra work, using
either the manufacturerŌs software or the RAW converter in Photoshop
CS, which I used. RAW always requires some sharpening and lately
IŌve been using Focus Magic (www.focusmagic.com) at a very low setting
(2 or 3 usually).  A
different set of controls works from the OK button on the back of
the camera. This button, surrounded by a 4-way rocker switch, allows
you to navigate and make choices, such as ISO, White Balance, and
other functions. These are settings you might set once and then
leave alone during a shooting session. The camera body buttons are
the ones you may want to adjust as you shoot.
A
different set of controls works from the OK button on the back of
the camera. This button, surrounded by a 4-way rocker switch, allows
you to navigate and make choices, such as ISO, White Balance, and
other functions. These are settings you might set once and then
leave alone during a shooting session. The camera body buttons are
the ones you may want to adjust as you shoot.